Monday, August 24, 2009

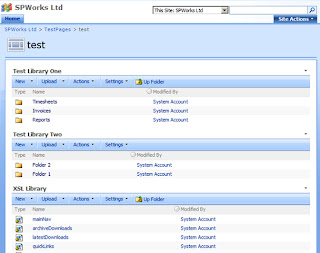
Adding an 'Up Folder' button to a SharePoint List View Webpart

A little while ago I was asked if it was possible to add an 'Up Folder' button so that users could navigate back to the parent folder in a ListView webpart. I knew you could easily add a button to the ListView toolbar and adding the functionality to go to to the parent folder couldn't be that difficult so I said

yes. However, it wasn't as straight forward as I would have hoped.

Adding the toolbar button


Adding the button to the toolbar is pretty straight forward, you just need a feature with a CustomAction, which in turn adds the button...

<CustomAction Title="Up Folder"


Location="ViewToolbar"


Id="TheKid.UpFolder"


Sequence="100"


RegistrationType="ContentType"


RegistrationId="0x01"


Description="Navigates up a folder in a ListView Webpart"


ControlAssembly="TheKid.CustomActions.Backup, Version=1.0.0.0, Culture=neutral, PublicKeyToken=919ab618f7ce98cf"


ControlClass="TheKid.CustomActions.Backup.Action" />

This is using a class which inherits from SPLinkButton and displays the button on the ListViewWebPart toolbar. This works no problem and we can then write some code to navigate the 'Up Folder' functionality.

NOTE: In the CustomAction above we are using RegistrationType='ContentType' and RegistrationId="0x01". This is going to register this button for every content type (essentially every list & document library), so if you want to restrict this functionality you can by changing these values.


Formatting the link


The ListViewWebPart uses post-backs to change the folder displayed, in particular it uses a javascript function called EnterFoler to perform the postback. This function takes one parameter which is the formatted URL for the folder to which you wish to navigate. The URL should be the current URL with three parameters, the RootFolder, the Folder Content Type ID and the View Guid.

So to format the link we need to know the parent folder URL, which you would have thought you could get in code no problem...apparently not. I could not find anything which would give me access to the current folder of the ListView in order to workout the parent folder. Unfortunately I had to resort to reflection to get this information, not something I generally like doing and I wouldn't recommend it...but when needs must!!


The ListViewWebPart contains a private variable called 'rootFolder' that contains the current folder the webpart is displaying, as this was exactly what I needed I used that...

private static object GetPrivateFieldValue(object obj, string fieldName)
{
FieldInfo fi = obj.GetType().GetField(fieldName,
System.Reflection.BindingFlags.Instance
System.Reflection.BindingFlags.NonPublic);
return fi.GetValue(obj);
}


This code can be used to obtain the value of the private variable contained within the ListViewWebPart. This I used to not only get the 'rootFolder', but also a variable called 'folderCtId' which holds the content type ID (it's always been blank for me??).
With these two bits of information I was able to build the URL so that when the button was clicked it would navigate the ListView up to the parent folder...


string sCurrentUrl = HttpContext.Current.Request.Url.ToString();
if (sCurrentUrl.Contains("?")) sCurrentUrl = sCurrentUrl.Substring(0, sCurrentUrl.IndexOf("?"));
string sCTID = (string)GetPrivateFieldValue(lv, "folderCtId");
string sStart = ((sNewRootFolder == "") ? "?" : SPHttpUtility.EcmaScriptStringLiteralEncode(sCurrentUrl


+ "?RootFolder=" + sNewRootFolder) + "&");
sStart = SPHttpUtility.EcmaScriptStringLiteralEncode(sCurrentUrl + "?RootFolder=" + sNewRootFolder) + "&";
string sNavigateUrl = sStart
+ "FolderCTID=" + SPHttpUtility.EcmaScriptStringLiteralEncode(sCTID)
+ "&View=" + SPHttpUtility.EcmaScriptStringLiteralEncode(lv.ViewGuid)
+ "&Key=" + lv.StorageKey.ToString();
return "javascript:EnterFolder('" + sNavigateUrl + "');return false";


Here you see the URL being constructed with the required QueryString parameters. You will also see that I have added a 'Key' parameter, this was to ensure the button would work on a page with multiple ListViewWebParts. This 'Up Folder' button will work even when there are multiple webparts for the same document library...


Sunday, August 23, 2009

SQL Server - Backup - Restore - Mirrored


We will go over the following important concepts of database backup and restore.


1.Conventional Backup and Restore
2.Spilt File Backup and Restore
3.Mirror File Backup
4.Understanding FORMAT Clause
5.Miscellaneous details about Backup and Restore
 
Note: Before running all the examples, make sure that you have the required folders created on your drive. It is mandatory to create Backup folders prior to creating backup files using SQL Server.


In our example, we will require the following folders:
  • C:\Backup\SingleFile
  • C:\Backup\MultiFile
  • C:\Backup\MirrorFile

Conventional and Split File Backup and Restore

Just a day before working on one of the projects, I had to take a backup of one database of 14 GB. My hard drive lacked sufficient space at that moment. Fortunately, I had two 8 GB USB Drives with me. Now, the question was how to take a backup in two equal sizes, each of 7 GB, so I can fit them on each USB drive. Well, conventional backup takes one large backup in one file. However, SQL Server backup command can take backups in two or more split parts.
Let us see an example of a conventional one-file backup using the AdventureWorks database.

BACKUP DATABASE AdventureWorks
TO DISK = 'C:\Backup\SingleFile\AdventureWorks.bak'
GO

The result is displayed below. Here, the backup is taken in a single file.


Now, let us see how we can split one database into two different database files. This method is very similar to taking a single-file backup. By simply adding an additional DISK option we can split the files backup files.


BACKUP DATABASE AdventureWorks
TO DISK = 'C:\Backup\MultiFile\AdventureWorks1.bak',
DISK = 'C:\Backup\MultiFile\AdventureWorks2.bak',
DISK = 'C:\Backup\MultiFile\AdventureWorks3.bak'
GO

In the previous example, we can clearly see that backup is split into three equal parts of the original backup file size.


Restoring a backup from a single-file backup is quite easy. Let us go over an example where we restore the AdventureWorks database from a single backup file.


RESTORE DATABASE AdventureWorks
FROM DISK = 'C:\Backup\SingleFile\AdventureWorks.bak'
GO
Running the above script will give a successful message.


Now let us see an example where we restore a database from a split file. This method is very similar to restoring a database from a single file; just add an additional DISK option.
RESTORE DATABASE [AdventureWorks]
FROM DISK = N'C:\Backup\MultiFile\AdventureWorks1.bak',
DISK = N'C:\Backup\MultiFile\AdventureWorks2.bak',
DISK = N'C:\Backup\MultiFile\AdventureWorks3.bak'
GO

Running the above script will give a successful message as shown in the image below.


Make sure that while restoring database, the database is not in use, otherwise it will give an error of database in use. In the event of an error taking place, close all the connections and re-attempt to restore the database.

Mirror Backup of the file

It is quite a common practice to create an exact copy of the backup and store it to several places to deal with any catastrophes which might affect the place where the database is stored. Once a full backup is accomplished DBAs generally copy the database to another location in their network using a third party tools like robocopy or native DOS commands like xcopy.

In SQL Server 2005 and later versions, there is a Mirror command that makes a copy of the database backup to different locations while taking the original backup. The maximum limit of additional locations that can be specified with MIRROR clause is 3.

Mirrored backup can be taken in local computer system as well as in a local network. Let us now see two examples of mirror backup.

Example 1. Single File Backup to Multiple Locations using Mirror
BACKUP DATABASE AdventureWorks
TO DISK = 'C:\Backup\SingleFile\AdventureWorks.bak'
MIRROR TO DISK = 'C:\Backup\MirrorFile\AdventureWorks.bak'
WITH FORMAT
GO

If this command is being run for the first time, it is mandatory to use the WITH FORMAT clause; but for sub sequential runs it is not required. WITH FORMAT reinitializes the backup.


When checked in both the folders ‘SingleFile’ and ‘MirrorFile’, backup files are exactly the same files. As mentioned earlier, four mirror backup can be specified in total.
Example 2. Split File Backup to Multiple Locations using Mirror

We have earlier seen an example where we can have multiple split files of large database backup files. SQL Server Mirror functionality also supports backup of the split files.

BACKUP DATABASE AdventureWorks
TO DISK = 'C:\Backup\MultiFile\AdventureWorks1.bak',
DISK = 'C:\Backup\MultiFile\AdventureWorks2.bak',
DISK = 'C:\Backup\MultiFile\AdventureWorks3.bak'
MIRROR TO DISK = 'C:\Backup\MirrorFile\AdventureWorks1.bak',
DISK = 'C:\Backup\MirrorFile\AdventureWorks2.bak',
DISK = 'C:\Backup\MirrorFile\AdventureWorks3.bak'
WITH FORMAT
GO
All the mirror sets will need the same number of DISK clauses as the original backup media.


Mirrored database backup can be restored using the same method as the original backup. Mirrored backup is in fact an exact replica of the original backup.
 
Understanding the FORMAT Clause


The FORMAT clause is used to reinitiate a backup media. Although it is a very useful clause it should be used with caution. When the clause is used it erases everything present in backup media. I have noticed that some DBAs are confused while taking a backup on a local disk where they have SQL Server installed. They have a misconception that if the format command is used, it will erase the complete disk including the SQL Server installation. However, the fact is that SQL Server format clause is quite different from OS format. The effect of SQL Server format clause is limited to a folder or path specified in the DISK clause.

In our example, when the FORMAT clause is specified, it will format only folders like C:\Backup\MultiFile\ or C:\Backup\SingleFile.

Related Errors
Error 3010


Invalid backup mirror specification. All mirrors must have the same number of members.
This error can show up while taking a mirrored database backup along with a regular backup; and DISK and MIRROR TO DISK do not match accurately.
The following image demonstrates how the error takes place.


To fix the error, match the members of DISK and MIRROR TO DISK to each other.


Error 3215


Use WITH FORMAT to create a new mirrored backup set
This error can spring up when a new backup is initiated and an existing media header needs to be reset for all headers on the backup media. If there is already a backup on the media, it will display this error and prevent backup from being overwritten. To fix this error, use WITH FORMAT as shown in an earlier example.

Miscellaneous details about Backup and Restore

When no options are specified, BACKUP DATABASE takes only full backups. Before taking the first log backup, full database backup is necessary to take one full backup. Backups created on later versions of SQL Server cannot be restored to earlier versions of SQL Server. The user needs permissions of sysadmin or db_owner or db_backupoperator roles to perform backup operation.